Testing and balancing Mixes

Connect your trigger interface, pad controller, and computer to the QSR to test your Mixes and balance drum sound levels.

Before you begin

  • Review the general concepts presented in this Manual.
  • Install and configure required software.
  • Set up your hardware.
  • Create custom Programs and Mixes.

About this task

If you have created one or more custom Mixes following the Programming Strategy guidelines set forth in this Manual, you can test and balance your Mixes using this procedure.

The procedures for creating and editing Program and Mix templates mostly use QS Edit Pro software and your computer's MIDI interface to audition sounds. When you play Mixes using your drum synthesizer pads, triggers, or controllers, the levels of individual Mix channels may be unbalanced. Mix channel levels may need adjustment due to variations in pad sensitivity. I will explain the steps for simultaneously connecting the computer MIDI interface and other MIDI components and describe my method for balancing a Mix.

The connection diagram below shows the recommended MIDI connections for a system that includes both a pad controller (Control Pad) and a trigger interface (Trigger iO).


QS Drum Synthesizer connection diagram

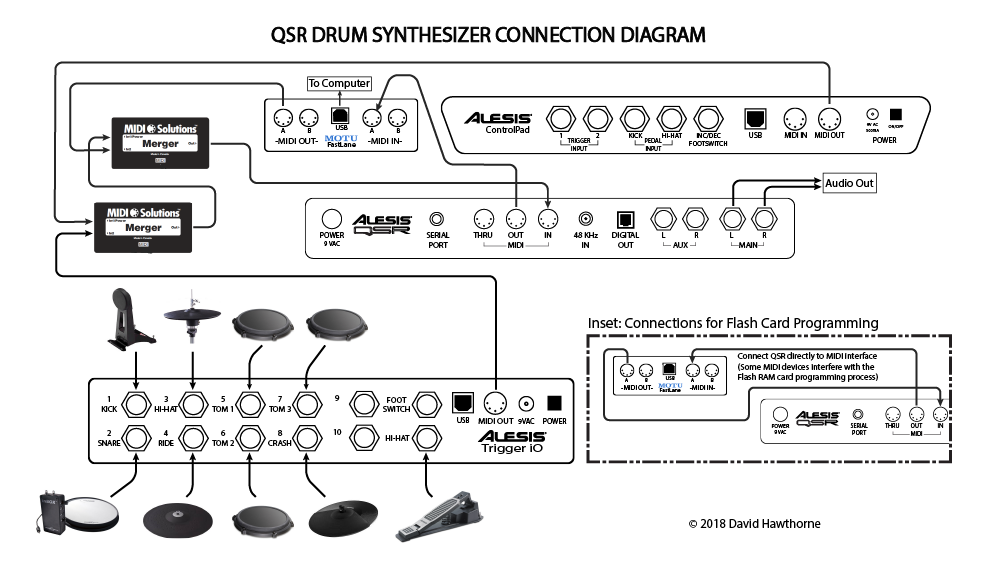
While developing Programs and Mixes with QS Edit Pro, we used a simple connection between the computer MIDI interface and the QSR. The MIDI Out port of the MIDI interface was connected directly to the QSR MIDI IN port. But to test with your system pads and triggers, you must integrate both the computer MIDI interface and other MIDI components.

As shown in the connection diagram above, MIDI mergers are used to integrate separate MIDI components. The MIDI merger receives MIDI commands and data from multiple sources, combines the data streams, and outputs the merged data on a single output port.

If your pad controller or trigger interface provides a MIDI Thru connection, you may be able to use that feature to integrate MIDI components. Otherwise, one or more MIDI Mergers will be required.

Tip: MIDI Mergers are available from several manufacturers in different configurations (for example, 2-channel, 3-channel, 4-channel, or larger). I use 2-channel MIDI mergers so I have the flexibility to relocate the Mergers if necessary.
Tip: Generally, you should place MIDI Mergers between the pad controller or trigger interface and the QSR MIDI In port. The QSR MIDI Out port is usually connected directly to the computer MIDI interface. However, there may be circumstances where you would place the Mergers on the input side of the computer MIDI interface. Experiment with different system connection schemes to find the best configuration for your needs.

Links to sections in this topic

Procedure

Testing the MIDI interface

  1. Make a simple, direct connection between the QSR and your computer MIDI interface.
  2. Test QS Edit Pro functionality using the procedure in the Installing Software topic, beginning with the Test QS Edit Pro MIDI communication steps section and continuing to the end of the topic steps.
    Important: Do not skip any testing steps. Verify that MIDI communication is working, Global Settings are correct, and QS Edit Pro controls work in Program mode and Mix mode. The QSR should respond to both Program and Mix changes.

Integrating and testing the Control Pad

  1. Use a MIDI merger to connect both the computer MIDI interface and your pad controller (if you have one) to the QSR.
    Attention: The MIDI merger may require power from the MIDI source on one input. Refer to the documentation for your merger for more information. Some MIDI components do not provide power on MIDI output ports. Verify that the MIDI merger is powered correctly.
  2. Repeat the steps in the Installing Software topic to verify that QS Edit Pro works with the MIDI merger connected between the computer MIDI interface and the QSR.
  3. Test the Control Pad using the steps in the Testing Your Hardware topic. This verifies that the Control Pad communication through the MIDI merger works.

Integrating and testing the Trigger iO

  1. If your system includes a Trigger iO, or other trigger interface, connect it to the system using a second MIDI merger as shown in the connection diagram above.
  2. Repeat the testing steps in the Installing Software topic to confirm that QS Edit Pro still controls the QSR.
  3. Confirm that the Control Pad (or other pad controller) works using the steps in the Testing Your Hardware topic.
  4. Refer to the documentation for the Trigger iO, or other trigger interface, to configure and test the operation of the interface with your specific pads, triggers, or controllers.
    Important: After integrating your MIDI components, you should be able to play Programs and Mixes using your drum synthesizer hardware. You should also be able to control the QSR using QS Edit Pro.
    Remember: Program play mode responds to MIDI commands on a single MIDI channel. Mix play mode uses separate MIDI channels for each of the drum sound groups, as outlined in the Programming Strategy topic. You must adjust MIDI channel settings on the Control Pad and Trigger iO when switching between play modes.

Testing Standalone Operation

  1. Temporarily disconnect the computer MIDI interface, leaving other connections intact, and verify your ability to play Mixes using your drum synthesizer pads.
    Note: During normal operation (live performance), the computer MIDI connection is not required. You should be able to disconnect the MIDI interface from the MIDI merger (or disconnect the interface from your computer) without affecting MIDI communication between your hardware and the QSR.
  2. After testing standalone operation, reconnect the computer MIDI interface.

Balancing Mix Levels

  1. Using QS Edit Pro, click File > QS Dump ALL Sysex Manager to open the QS Dump ALL Sysex window.
  2. Click File > Receive DumpALL from QS, then click Start to synchronize the software and the User bank contents. After receipt of the User bank data, close the QS Dump All Sysex window.
  3. Select a Mix for testing.
  4. Play the Mix using your hardware while evaluating the relative balance of the Mix drum sounds.
    Tip: If possible, use meters to match sound levels. Connect the QSR audio outputs to a mixer, recording interface, or other device that provides sound level metering capabilities. Meters provide precise level indications, allowing you to set the specific balance you need between drum sounds.
  5. To adjust the balance between drum sounds, use QS Edit Pro to change the volume levels (Vol parameter) of individual Mix channels. Click the Vol cell to open the Mix Edit window and change the Volume slider setting.
    Tip: Keep the volume level settings near the top of the range, if possible. Set the loudest drum sound levels to 99. To reduce the levels of Mix channels for softer drum sounds, use lower settings. This will help keep relative levels consistent as you change from Mix to Mix.
    Important: Make level adjustments with Effects active in the Mix. Effects settings can change the overall drum sound level.
  6. Make any other required changes to Mix channel settings after auditioning the Mix using your hardware.
  7. When Mix changes are complete, press the STORE button on the QSR front panel twice to save the changes to the User bank.
  8. After storing Mix edits, I recommend backing up the User bank contents using QS Dump ALL Sysex Manager. Save the SYSEX file to a backup folder on your computer.