Editing the Mix Template
Learn to create custom Mixes for the QSR Drum Synthesizer by editing your Mix Template using QS Edit Pro software.
Before you begin
- Create the drum Mix Template presented in the Creating the Mix Template topic or download the Mix Template using the link below.
- Refer to the Loading the QS Drum Programs Bank Sysex File topic for instructions on loading the Programs into the User bank.
- Verify communication between the QSR and QS Edit Pro.
About this task
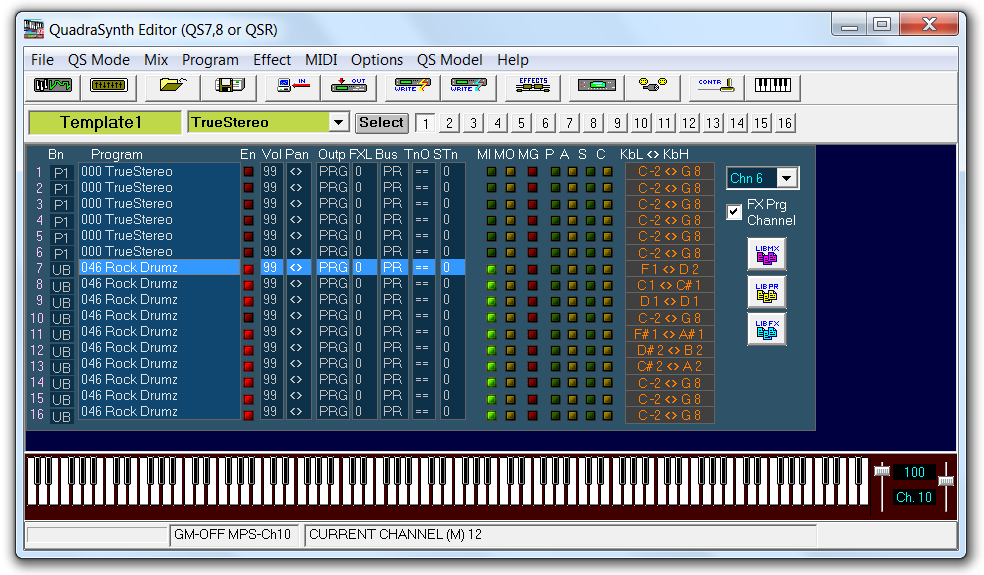
In this topic, you will edit the Mix Template to create new Mixes. The template simplifies creation of Mixes that follow the Programming Strategy topic guidelines. To create a new Mix, edit the template and write the modified Mix to the desired Mix location. We will start with the Mix Template created in a prior topic (loaded in Mix location 000). We will also use the Alesis QS Drum Programs, loaded into the User bank.
The Mix Template uses the same drum Program on each channel, and each drum channel's settings are identical. Playing the Mix Template as-is (using the appropriate MIDI channels) produces essentially the same result as if you were using the "Rock Drumz" Program in Program Play mode. The template settings are simply placeholders; you will replace Programs and change channel settings as you create new Mixes.
The sections below guide you through the editing process and introduce techniques you will use when creating your custom Mixes. You will learn to selectively change drum sounds, adjust parameters, write Mixes to new locations, and layer sounds from different Programs.
Links to topic sections
Procedure
Open the Mix Template
-
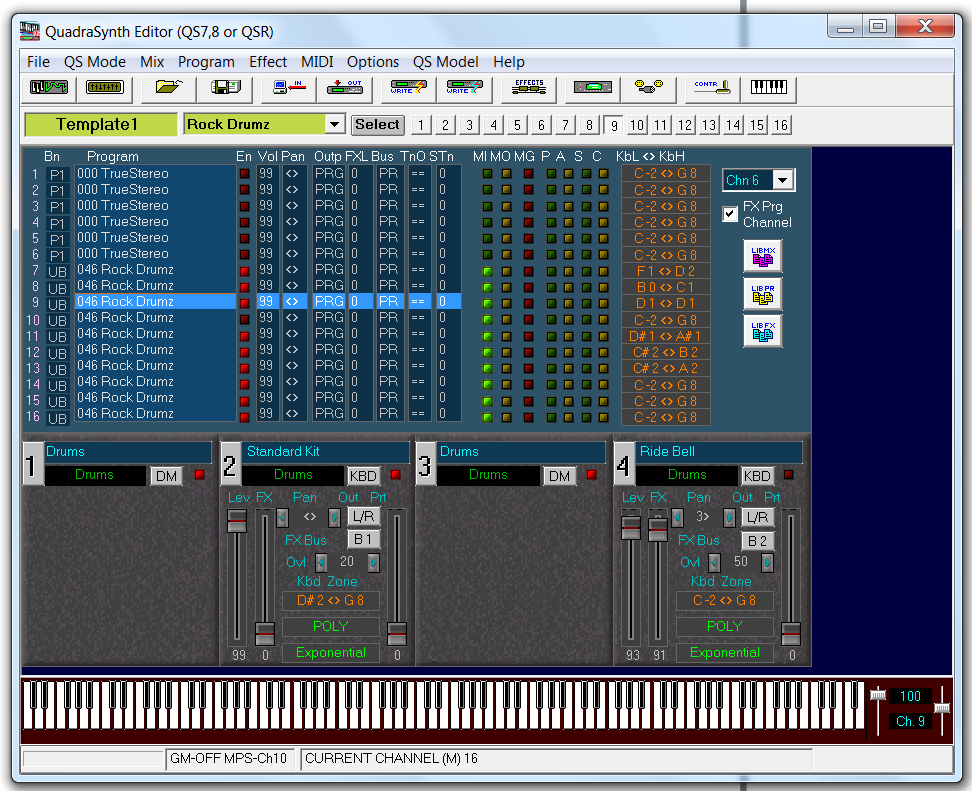
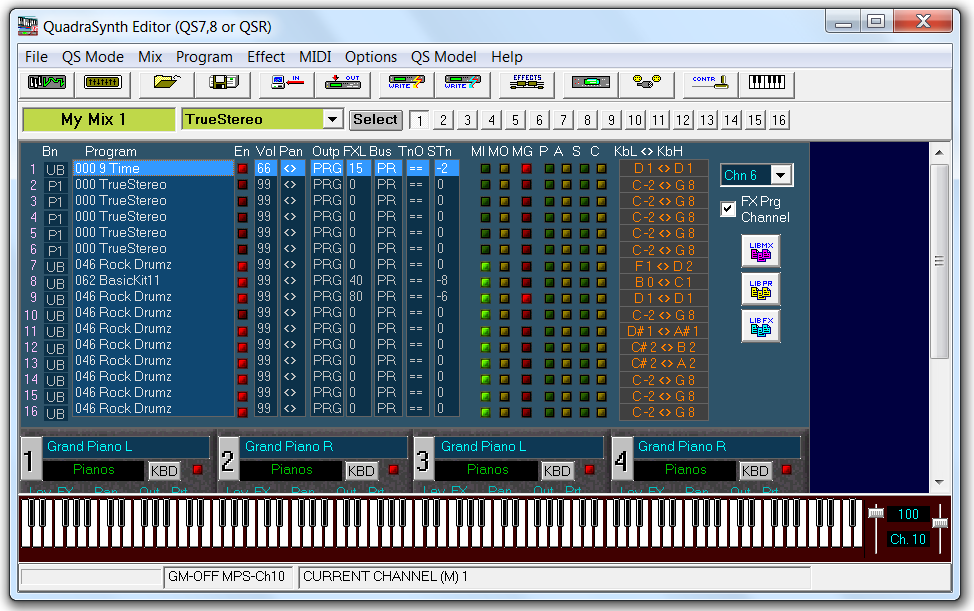
Verify that QS Edit Pro displays the Mix Mode window as
shown below.
Setting the Effects Program
-
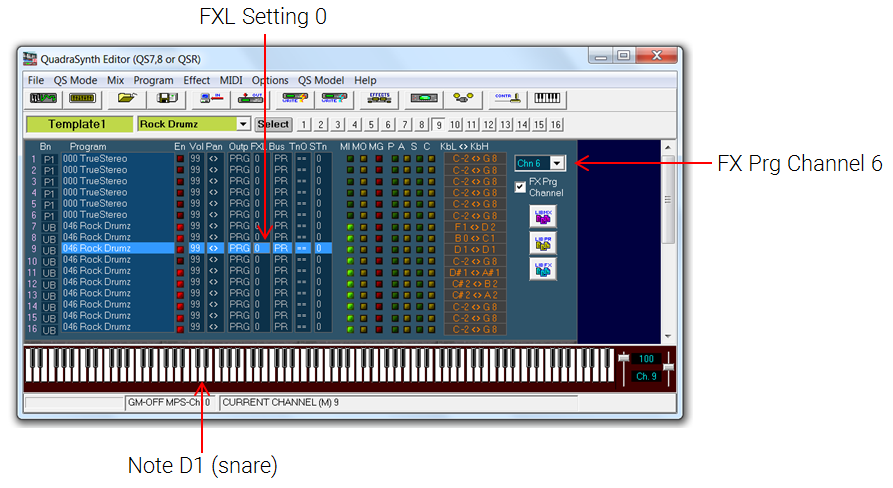
Verify that the Fx Prg Channel parameter in the
Mix Mode window is set to Chn 6.

-
Play the snare drum sound using the Virtual Keyboard. Set the MIDI
Channel slider control to Ch 9. Use note D1 to play the snare
sound.
The snare drum sound should be dry (no effects) because the FXL (effects level) setting on Mix channel 9 is 0. We will next increase the FXL setting to 99 to hear the maximum effects level.
-
Click the FXL cell in row 9 to open the Mix
Editor window. Verify that "MIX (Chn 9)" is shown at the top of
the window.
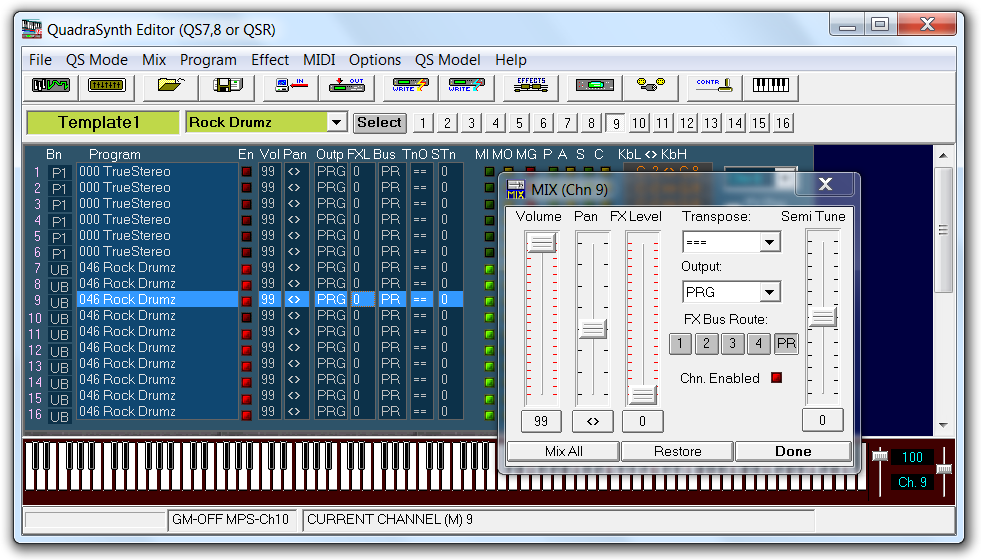
The Mix Editor provides controls for editing the volume, pan, effects level, and tuning parameters for the Program in the selected Mix channel. The default settings are full volume (99), center pan, effects level OFF (0), and pitch adjustment off (0 Semi Tunes). The window also allows setting of Effects Bus and Output. A value of PRG indicates that the settings defined within the Program itself will be used. -
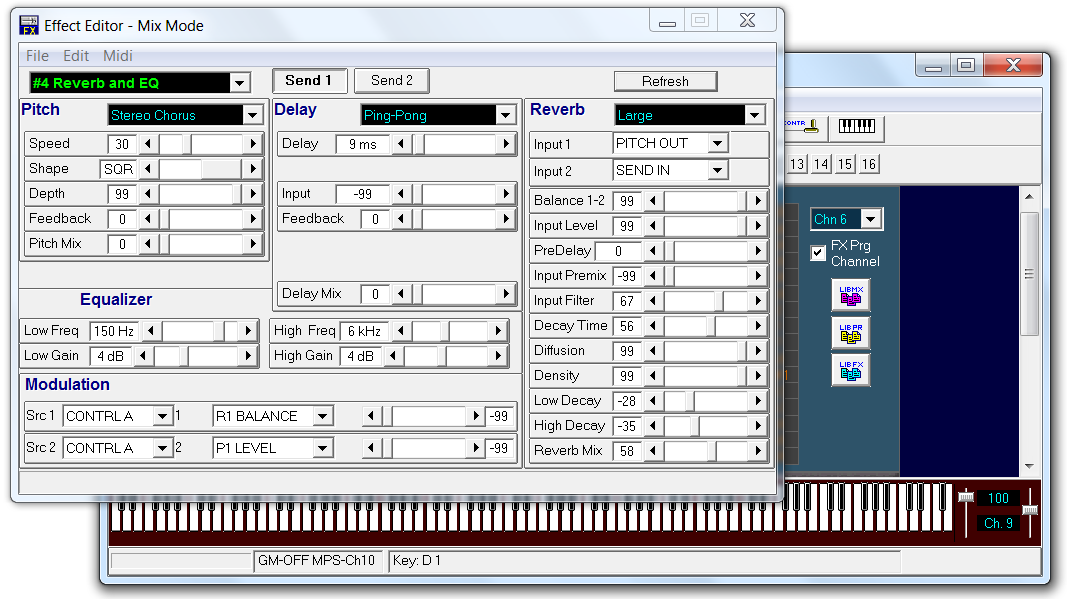
To view the effects parameter settings in Mix Mode click . This opens the editor with the parameters for the designated
Fx Prg Channel.
Editing Mix Channel Parameters
This section introduces techniques for editing Mix channel parameter settings. The example presented here uses the snare drum Mix channel (channel 9), but the same editing techniques can be applied to other drum sound Mix parameters as well.
-
Click the MIDI channel 9 button at the top of the
window, or click on the Program name in Mix channel 9, to select the channel.
Expand the window as shown below.
The "Rock Drumz" Program contains a good, general-purpose snare drum sound. The Program uses a single built-in sample—the "Fat Wood 1" snare sample.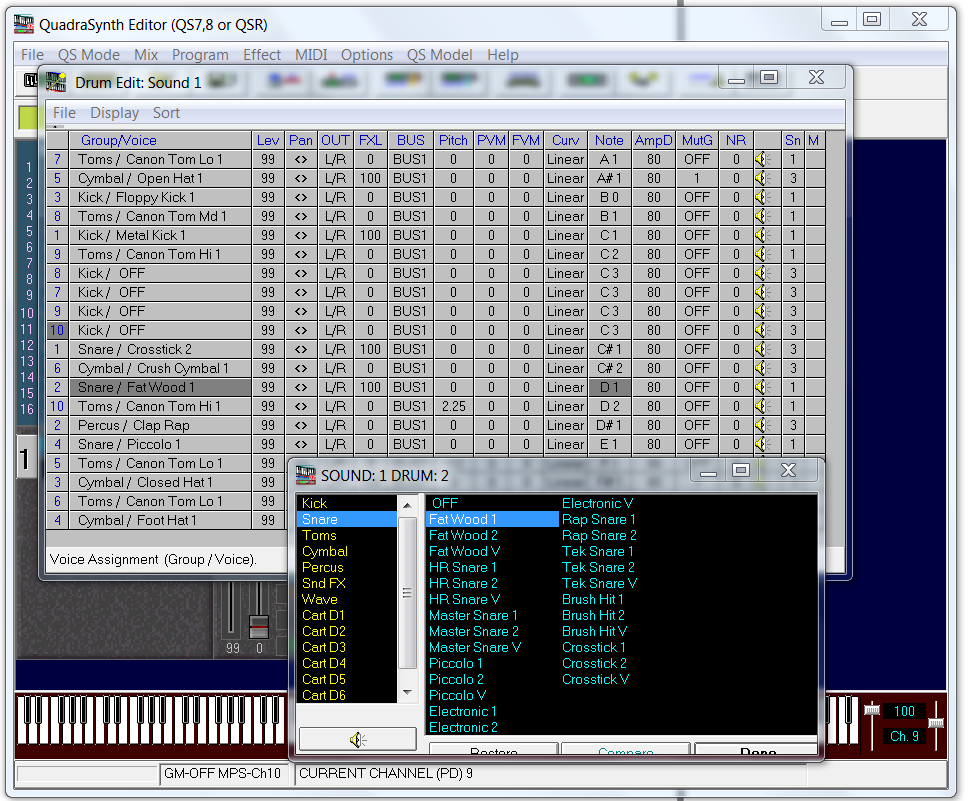
-
Click the FXL cell for Mix channel 9 to open the
Mix Editor window. Set the FX
Level slider to a setting of 80. Adjust
the Semi Tune slider to
-6.
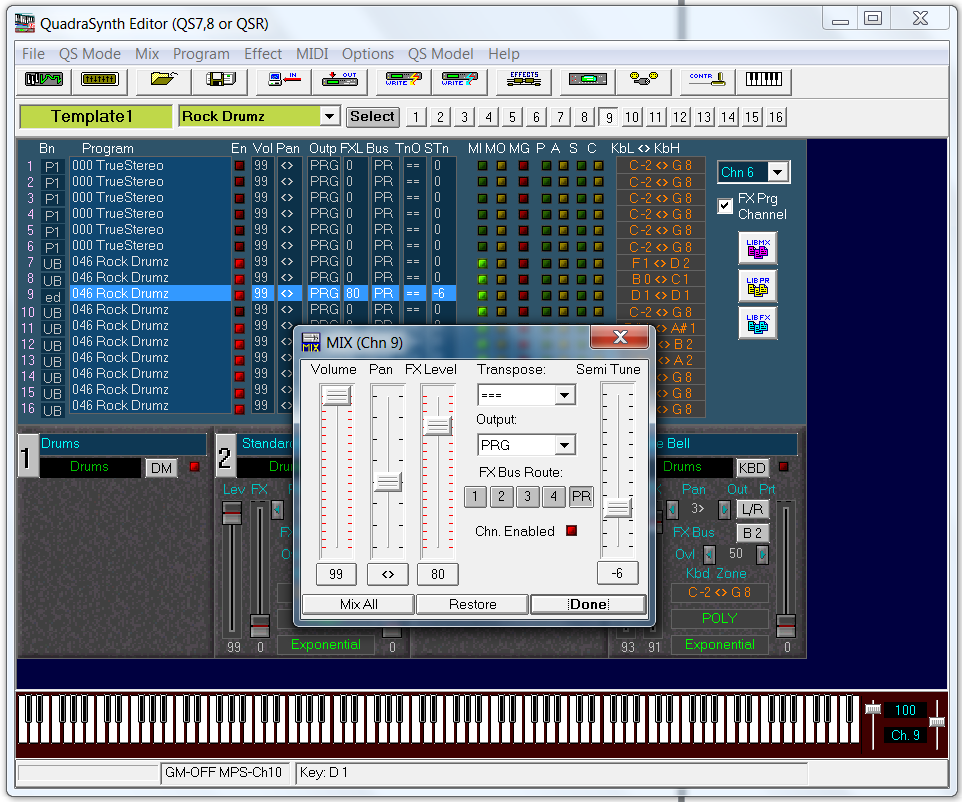
The Semi Tune control is used to change the pitch of the sample. In this case, we have detuned the snare drum sound to simulate a deep, wood snare drum. The FX Level setting of 80 gives the reverb a nice, long decay that does not overpower the dry sample. Snare drum sounds are typically panned center so we will leave the default Pan setting.
Saving the edited Mix
In this procedure, we have intentionally avoided storing the changes we made to the Mix Template (using the STORE button on the QSR front panel). Storing the changes in Mix location 000 would overwrite the Mix Template we created.
-
Type a new Mix name (for example, "My Mix 1"), then click
OK.
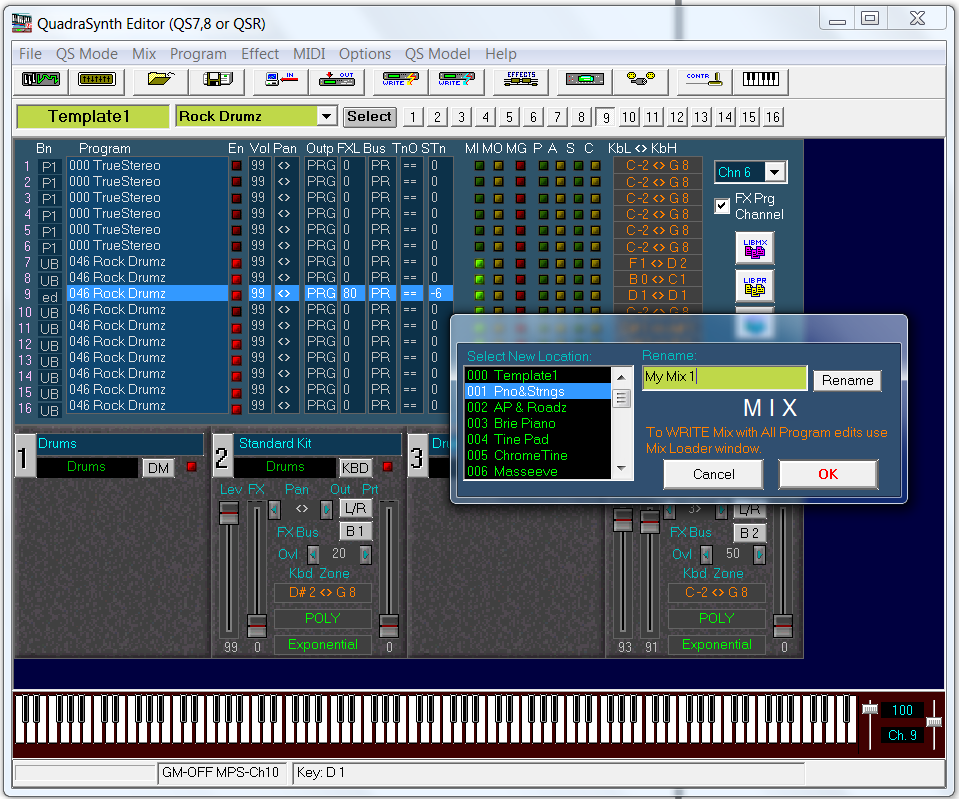
Tip: You should preserve the Mix Template saved in location 000 in its original state so it is ready for use in creating future Mixes. Save edits to the Mix Template in a new Mix location.
Using the Mix - All Channels window
-
QS Edit Pro offers an alternative interface for editing Mix parameters. Click
the Mix All button to open the Mix - All
Channels window below.
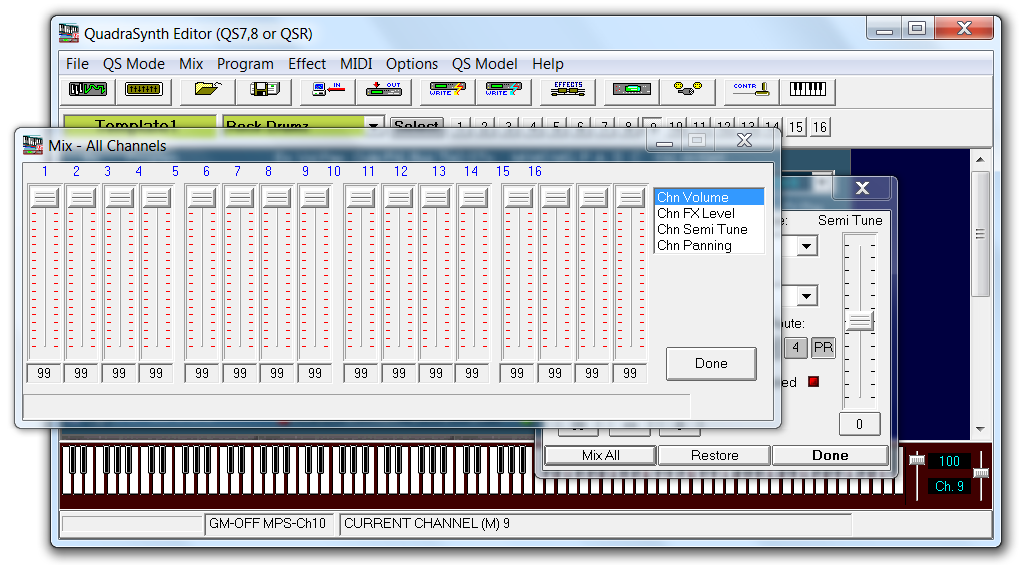
The Mix - All Channels window provides direct, simultaneous access to a selected parameter's settings for all 16 Mix channels. This window simplifies the process of blending Programs in a Mix. The parameter list located at the top-right corner of the window is used to select the parameter to be edited, such as volume level in this example. Using this window you can quickly balance levels of individual drum sounds or groups in a Mix.CAUTION:Note that the Mix channel labels at the top of the window do not always align with the correct slider. Be careful when adjusting sliders that you are using the correct control!
Changing a Mix channel Program
The Mix Template uses the same Program on each of the active Mix channels. Typically, you will use different Programs on one or more of the Mix channels to create interesting sound combinations. This section covers the procedure for changing the Program settings on individual Mix channels.
-
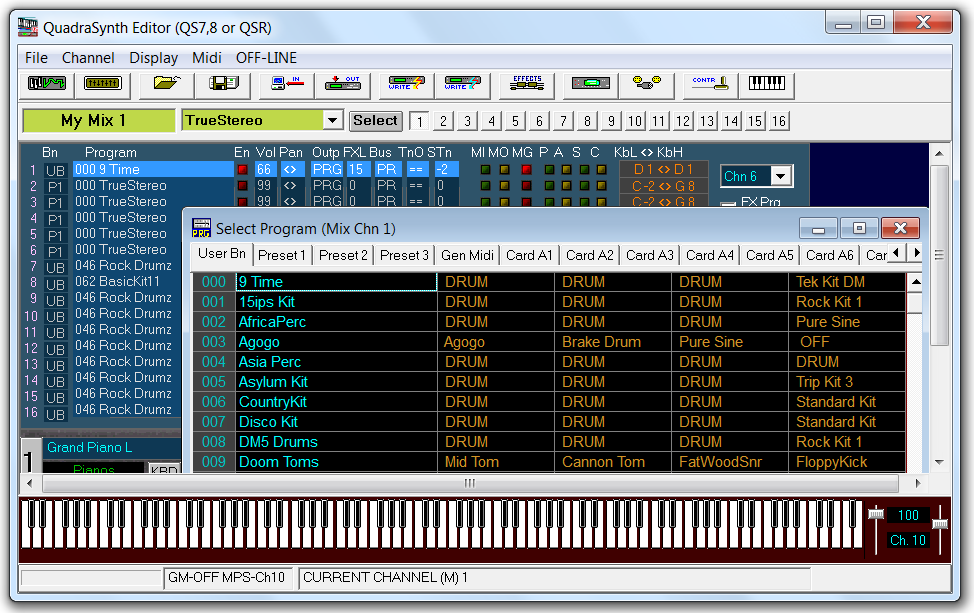
Double-click the Program name in Mix channel 8 to open the Program
Select window and choose User bank Program location 062
("BasicKit11").
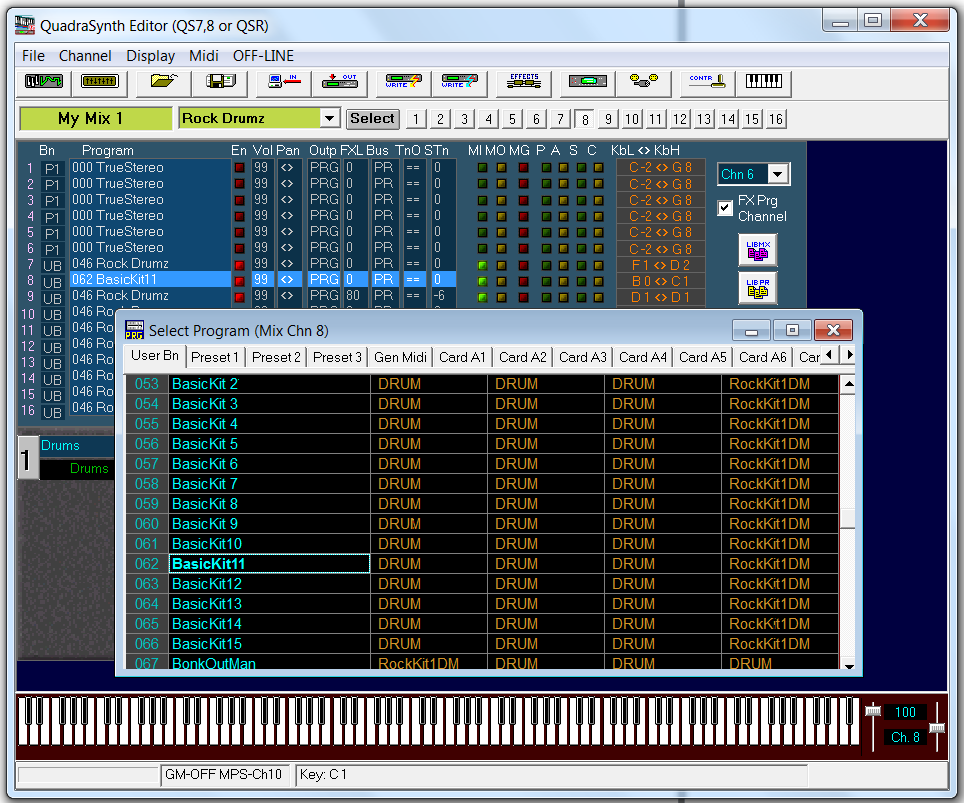
Tip: With the Program Select window open, you can use the Virtual Keyboard to audition sounds. This allows you to quickly test the kick drum sound in each Program. -
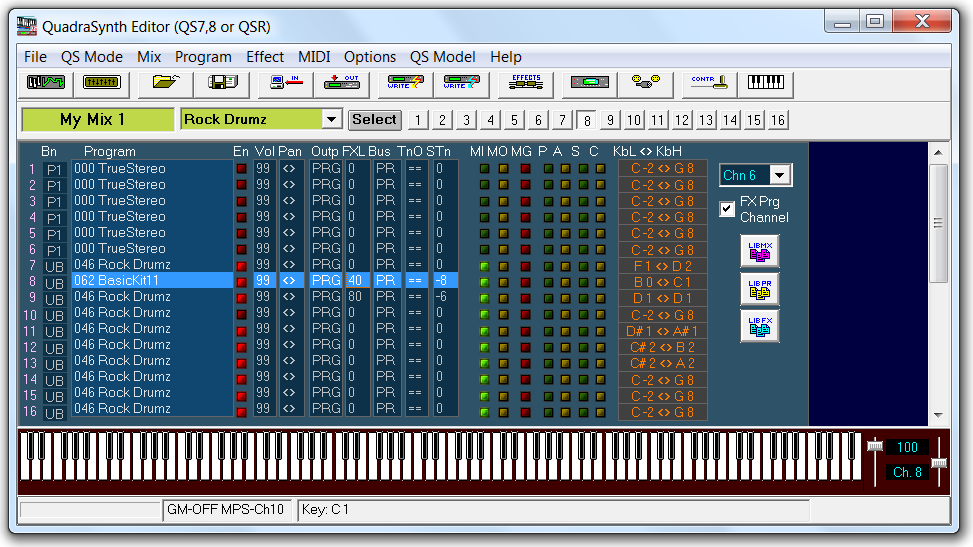
Open the Mix Editor window to adjust the kick drum Program
settings (click on the Vol or FXL
cell in Mix Channel 8). Set the FX Level to
40 and the Semi Tune slider to
-8. This lowers the pitch of the kick sound and adds
a little reverb.
Tip: Now that you have set up the snare sound on MIDI channel 9 and the kick sound on channel 8, you may find using the Virtual Keyboard is inconvenient because of the need to change MIDI channels to alternate between drum sounds. This is a good time to test the Mix using your controller or trigger interface. To trigger Mix sounds from your hardware, set your kick trigger to MIDI channel 8 and note C1. Then set your snare trigger to MIDI channel 9 and note D1. You should now be able to play both Mix channels, as you would in normal operation. You will find it is much faster and more natural to test Mixes using your system hardware.
Layering Programs in a Mix
Sound layering can be performed within a Program or within a Mix. This section describes the procedure for layering within a Mix using the Mix Group controls.
-
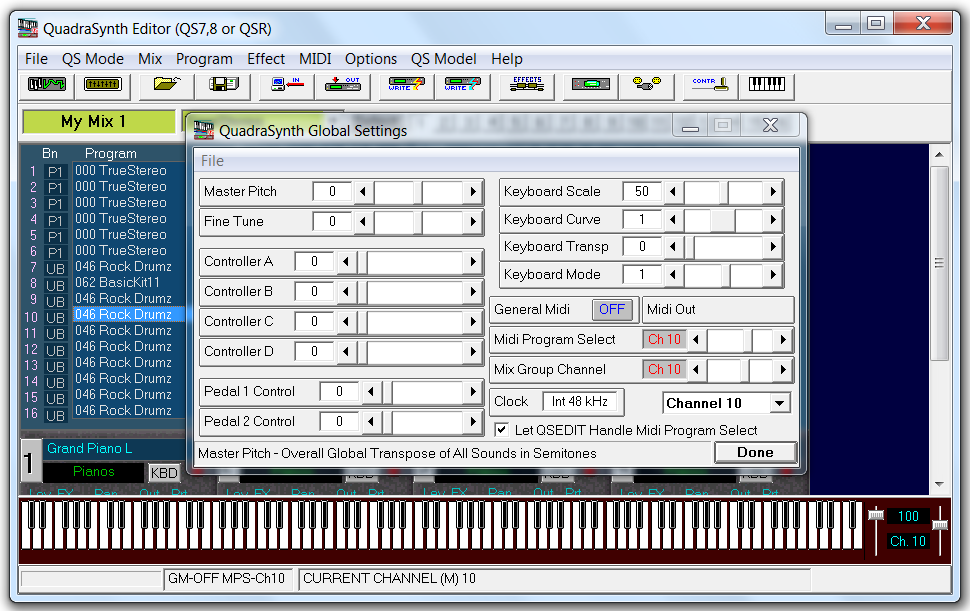
Click . Verify that the Mix Group Channel
parameter is set to Ch 10.
-
Double-click the "TrueStereo" Program name in Mix channel 1 to open the
Program Select window.
-
Click the MG button on Mix channel 9 to add the snare
channel to the Mix Group. Play the D1 note and compare the individual and
blended sounds by enabling or disabling either of the Mix Group channels (1 or
9).
Tip: This layering technique can be used with other drum sounds as well. Simply limit the note ranges of any Mix channels assigned to the Mix Group, using different note numbers for each drum sound to avoid unexpected results.Remember: To play layered Mix channels, you may have to change the MIDI channel settings for your system's pads or triggers. For example, a snare trigger that was previously set for MIDI channel 9 (the normal snare channel using my guidelines) would need to be reassigned to MIDI channel 10 (the Mix Group master channel) to play the layered Mix Group sounds.Restriction: Most drum sound groups can be assigned to the Mix Group without issues resulting from overlaps, with the exception of cymbal sounds. Cymbal sounds overlap with tom sounds, using the General MIDI note number standard. Reassign the cymbal or tom sound note numbers to eliminate overlap if you plan to assign both to the Mix Group.