Editing the Program Template

Save time by using your Program Template to create custom QSR Drum Synthesizer Programs. Learn editing techniques that you can apply to your custom Programs.

Before you begin

  • Review the general concepts presented in this Manual.
  • Determine your system configuration.
  • Download the software.
  • Assemble your hardware.
  • Verify communication between the QSR and QS Edit Pro.
  • Complete the Creating the Program Template topic or download the QSRdrums_Prog_template.zip file using the link below.

About this task

In this topic, you will edit the Program Template to create a custom Program. The template simplifies creation of custom Programs, saves time, and helps avoid errors that are difficult to troubleshoot.

Before creating your own Programs, consider how you will structure them. Having a clear strategy will help keep your Programs consistent and well-organized.
Tip: Don't feel obliged to squeeze an entire kit into a single Program. Instead, consider building Programs for individual drums or small groups of drums.
Restriction: You can use a specific note number only once in each sound layer, which limits you to 4 layers (sounds) per note.
Tip: Group two or more drums in a single Program to save space. Try to limit the number of drums within a Program to less than 10. Because a Program contains only 40 drum sound slots (10 in each of the 4 sound layers), limiting Programs to 10 drums allows you to layer the maximum number of drum sounds (4) on a single note number. If you don't need to use any layering (or velocity crossfading), then you can include more than 10 drums in a Program.

I group drums in my Programs to match the Mix channel grouping strategy presented in the Programming Strategy topic. I separate the toms, the kick, the snare, the hi hat, ride cymbals, crash cymbals, and percussion into separate Programs. There are 128 Program locations in the User bank, which is usually enough for most applications.

In this topic, we will create a Program containing the kick, snare, and toms. Several layering techniques will be demonstrated that you can apply to other drum Programs.

Links to topic sections

Procedure

Loading the Program Template

  1. Open QS Edit Pro software.
    Attention: Before editing, back up the QSR User bank data to your computer.
  2. Load the Program Template into a User bank Program location in preparation for editing. Click Program > Load Single Program from Disk. Navigate to the folder where you saved the template file, select the template, and click Open.
    QS Edit Pro Program Mode window, ProgTmplt1 in location 000
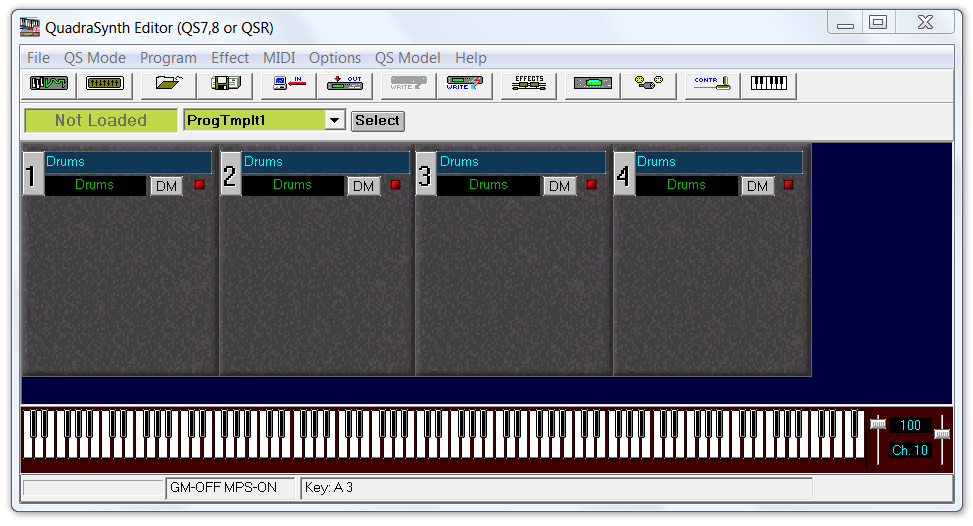
    Tip: I use Program location 000 for editing, as a general rule. After finishing edits, I rename the Program before writing it to a permanent location in the User bank.
  3. Click STORE on the QSR front panel twice to save the template.

Preparing to Edit the Template

  1. Click the drum sound layer 1 button to open the Drum Editor window.
  2. Click Display > ALL Drums to view all 40 drum sound slots.
  3. Click the Voice Number cell in row 1 (first column), then click Sort.
    QS Edit Pro Drum Edit window, Program Template sorted by voice number
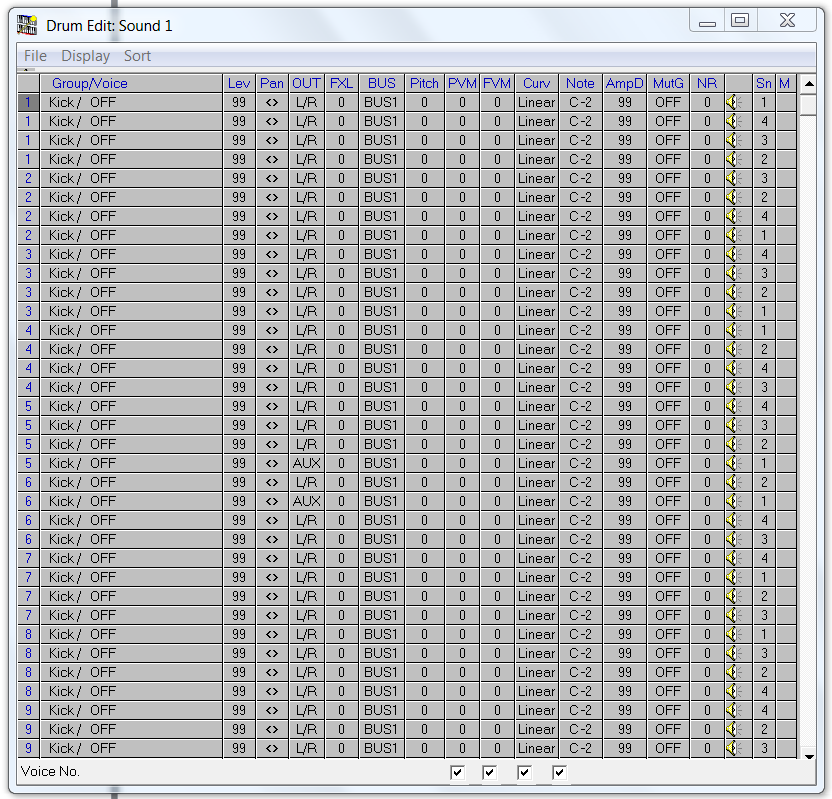
    Tip: Sorting by voice number simplifies the editing process. Remember the restriction limiting the use of a specific note to one drum sound slot in each sound layer. Using the same voice number in each sound layer when layering sounds in a Program will help you avoid violating this rule.

Editing the Snare Drum Sound

Note: We will use the 4 drum sound slots with voice number 1 (1 from each sound layer) for the snare drum.

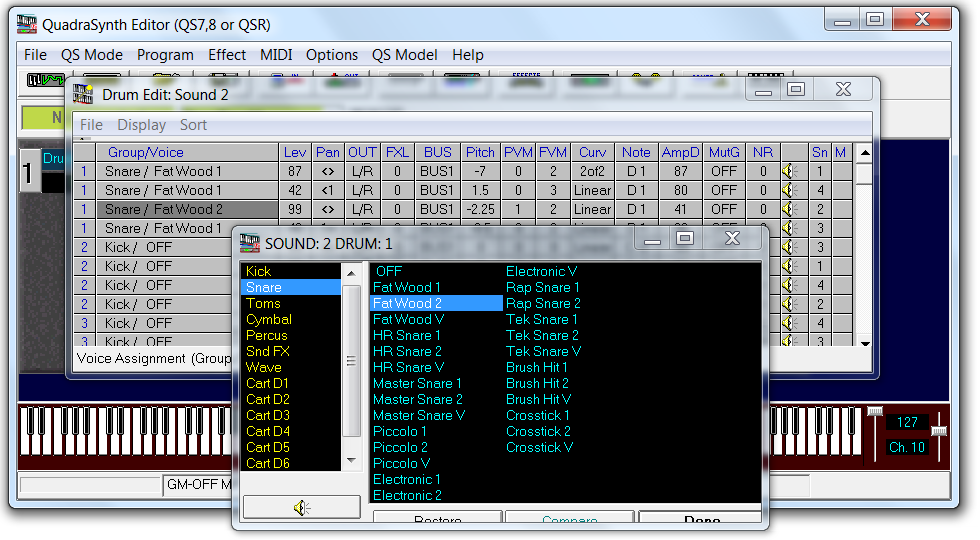
  1. Double-click the Group/Voice cell in the row for layer 1, voice number 1. The Drum Sample Select window will open.
    QS Edit Pro Drum Sound Sample Select window
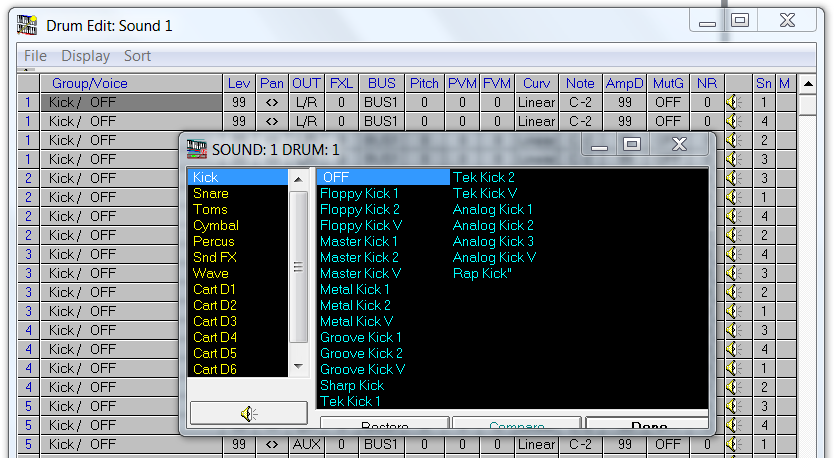
  2. Click the Snare Sound Group in the left pane to view the built-in snare drum samples.
    QS Edit Pro Drum Sample Select window, Fat Wood 1 sample selected
  3. Click to select the "FatWood 1" sample, then click Done.
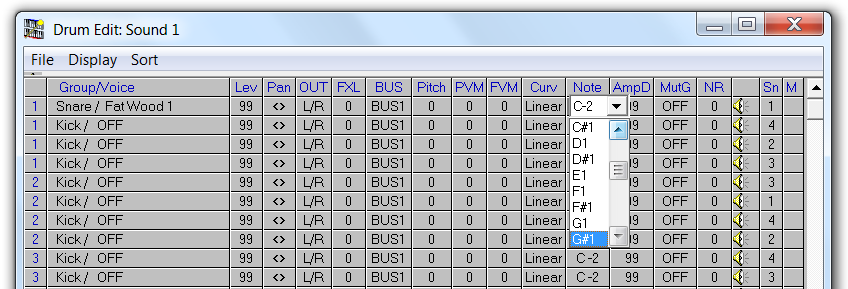
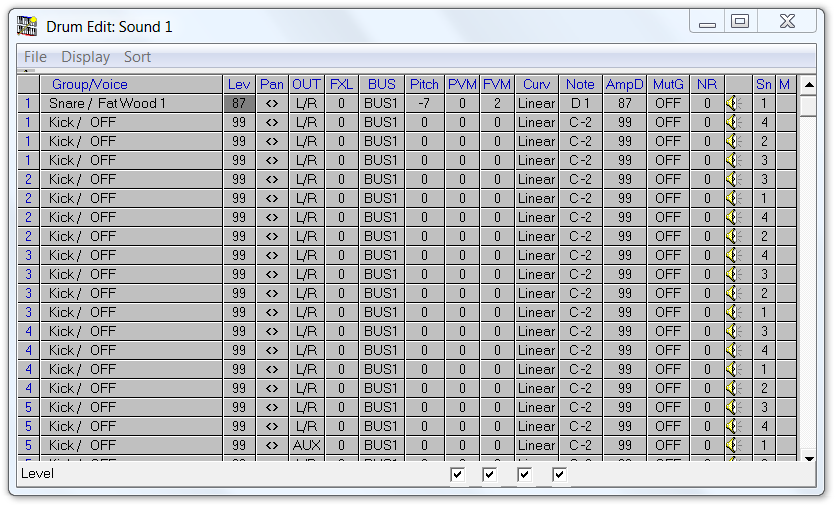
  4. Double-click the Note cell in the "FatWood 1" sound slot (row 1 in this example), then set the Note to D1.
    QS Edit Pro Drum Edit window, set note number
  5. Play the snare sound using your hardware (pad or trigger) or the Virtual Keyboard (note D1). You should hear the dry, unprocessed sample sound.
    Trouble: The MIDI channel slider setting must match the MIDI channel setting on the QSR front panel LCD display when using the Virtual Keyboard in Program play mode. Likewise, your pad must be set to send Note On commands over the same MIDI channel.
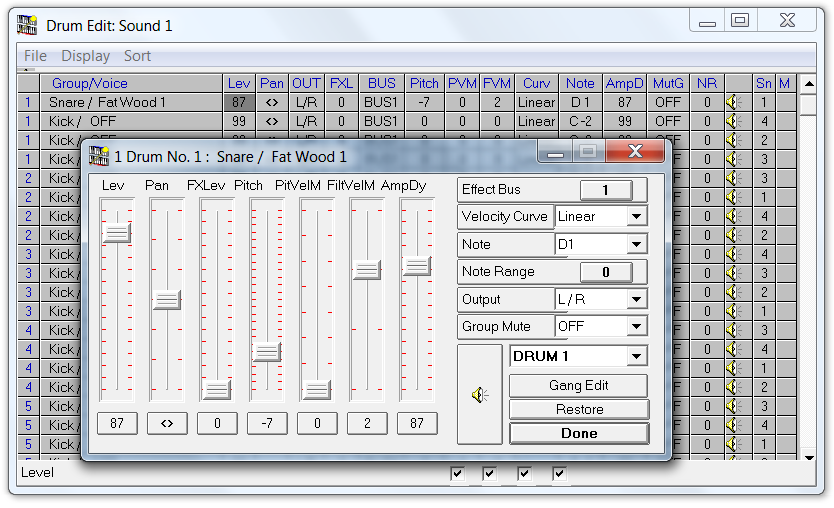
  6. Double-click the Lev cell in the "FatWood 1" sound slot to open the Drum Sound Edit window. Set the Lev slider to 87, set the Pitch to -7, set the FiltVelM to 2, and set the AmpDy to 87.
    QS Edit Pro Drum Sound Edit window, FatWood 1 settings
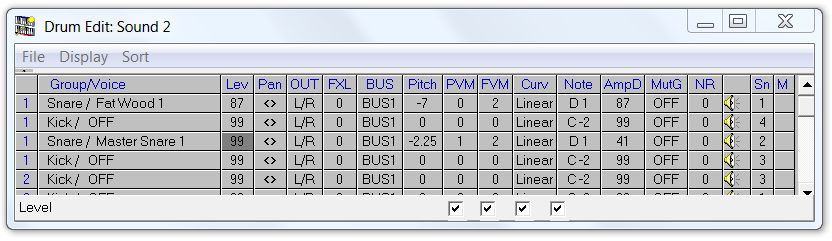
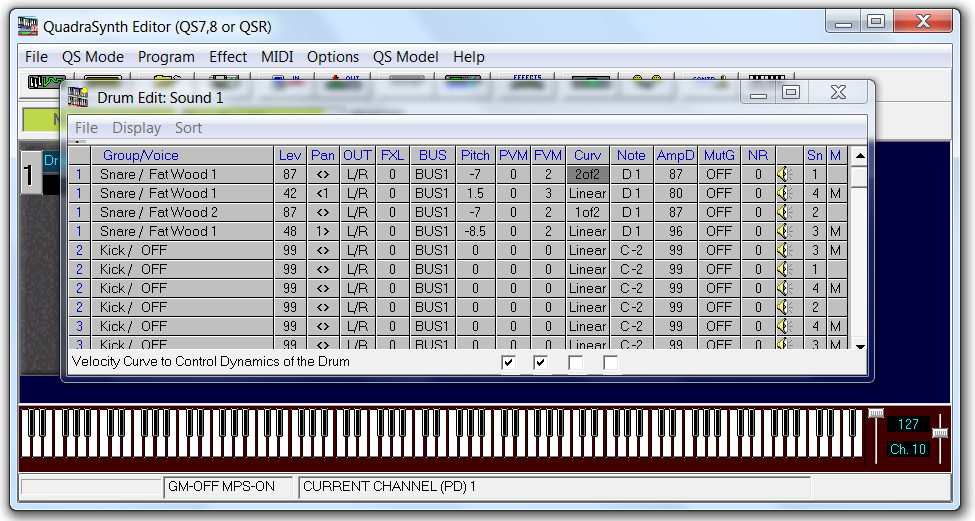
  7. Click Done to close the Drum Sound Edit window, then verify the settings in the Drum Edit window below.
    QS Edit Pro Drum Edit window, FatWood 1 settings
  8. Play the snare sound using your pads or the Virtual Keyboard, note D1. Listen carefully to the changes produced by the edited sound parameters. Changing the Pitch lowered the tone of the snare drum sound. The other parameter changes produce subtle effects.
    Tip: Use your pads or triggers to test the Filter Velocity Modulation (FiltVelM) parameter. This allows you to dynamically change the note velocity and see how the Program responds to your playing.
    Tip: I recommend editing drum sounds with no Effects applied.
  9. Press the STORE button on the QSR front panel twice to save the edits.

Adding Snare Drum Layers

Tip: Combining the basic "FatWood 1" snare sound with other sound layers produces a more complex sound. Use layering to make the drum sound more realistic or to create interesting combinations.

  1. Double-click the Group/Voice cell in the row for sound layer 2, voice number 1, to open the Drum Sample Select window.
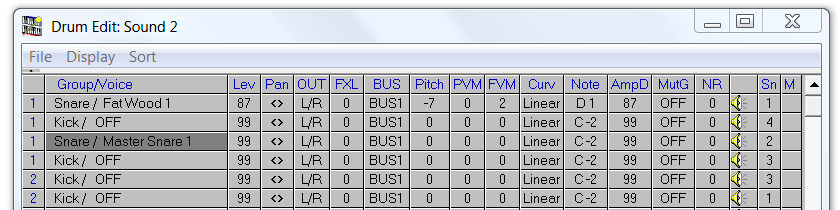
  2. Select the Snare Sound Group, then select the "MasterSnare 1" sample. Click Done to close the window.
    QS Edit Pro Drum Edit window, MasterSnare 1 selected
  3. Double-click the Note cell to change the "MasterSnare 1" slot to D1.
    QS Edit Pro Drum Edit window, MasterSnare 1 set to note D1
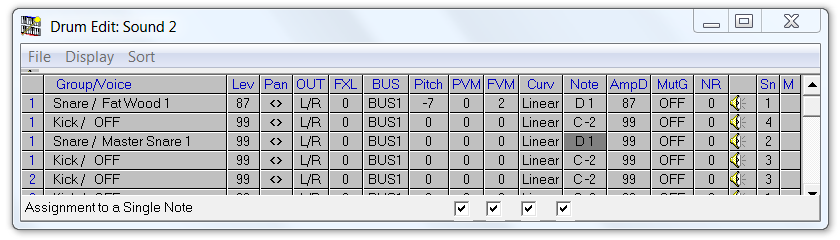
    Tip: Use the Sound Layer Enable check boxes at the bottom of the Drum Edit window to temporarily enable or disable the sound layers while auditioning the snare sound. Listen carefully to the differences between the two sounds and to the blended sound.
  4. Adjust the "MasterSnare 1" sound parameters as shown below. Set the Lev slider to 99, Pitch to -2.25, PVM to 1, FVM to 3, and AmpDy to 41.
    QS Edit Pro Drum Edit window, MasterSnare 1 settings
  5. Press the STORE button on the QSR front panel twice to save the edits.
  6. Audition the snare sound again. Observe that the addition of the "MasterSnare 1" sample adds crispness to the snare drum attack. The AmpDy setting forces this sound to decay faster than the "FatWood 1" sound, so the lower tone of the "FatWood 1" sound dominates the drum's "ring".
    Note: The two sounds layered on note D1 are panned center. We will create a wider sound by next layering sounds that are slightly panned left and right.
    Tip: When using panned sounds you should normally route the sounds to a pair of stereo outputs (such as the Main Left and Right outputs). If you plan to use Aux outputs as mono channels, any sounds sent to those outputs should be panned hard left or right.
  7. Edit the sound slots in layers 3 and 4, voice number 1, as shown below. The "FatWood 1" sample is used in these slots, but the parameter settings are different. Set the Pan slightly left and right to spread the sound's stereo image. Use variations on the Pitch, AmpDy, and other parameters to increase the complexity of the sound.
    QS Edit Pro Drum Edit window, 4 snare layers shown
  8. Press the STORE button twice to save the edits.

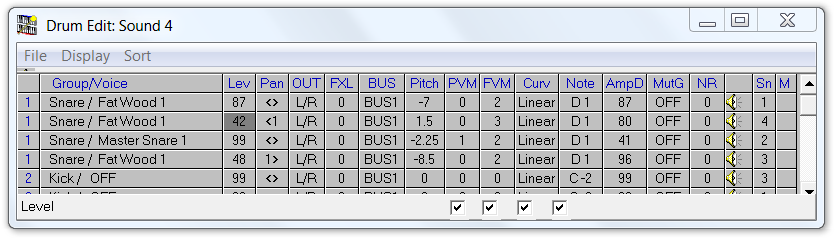
Using Velocity Crossfading

The snare drum Program we created above uses a Linear setting for the velocity curve (Curv) on each sound. In this section, we will explore the use of velocity crossfading. Refer to the QSR Reference Manual for a complete description of velocity curve options and velocity crossfading.

  1. Double-click the Group/Voice cell for sound layer 2 ("Snare/MasterSnare 1" sound row) to open the Drum Sample Select window.
  2. Open the Snare Sound Group, and select the "FatWood 2" sample. Then click Done to close the window.
    QS Edit Pro Drum Sample Select window, FatWood 2 sample selected
  3. Double-click the Lev cell to open the Drum Sound Editor window for the "FatWood 2" sound slot.
  4. Set the controls as shown below, paying attention to the Velocity Curve setting.
    QS Edit Pro Drum Edit window, FatWood 2 settings for velocity crossfading
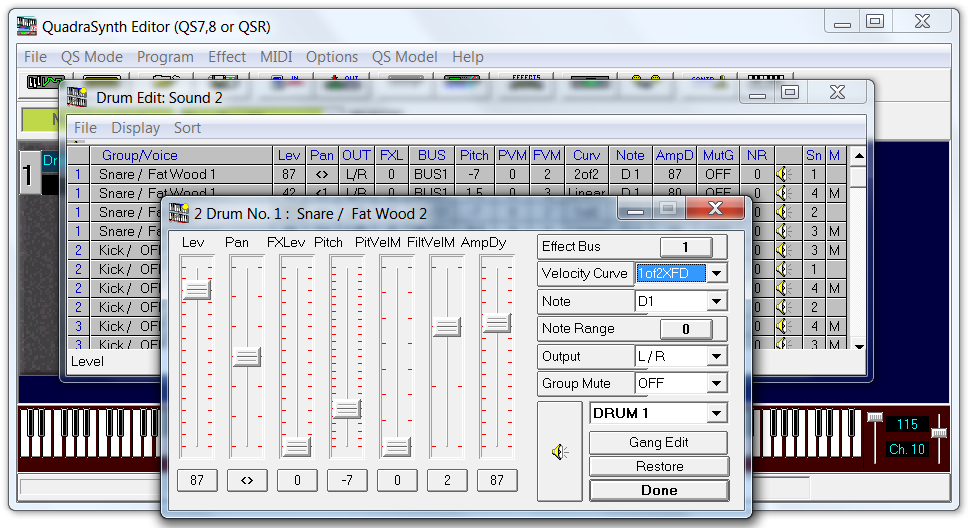
    Important: Select 1of2XFD from the Velocity Curve dropdown menu.
    Note: The 1of2XFD and 2of2XFD settings are used together to implement velocity crossfading. The QSR will automatically transition between samples as the velocity changes. 2of2XFD is used with full volume drum samples and 1of2XFD is used with soft drum samples.
  5. Change the drum sound parameters for the "Snare/FatWood 1" sound slot as shown below. This slot uses the 2of2XFD Velocity Curve setting.
    QS Edit Pro Drum Edit window, settings for snare drum velocity crossfading
  6. Disable sound layers 3 and 4 using the buttons at the bottom of the Drum Edit window, as shown in the preceding image.
  7. Test the snare drum sound using your pad, trigger, or controller.
    Restriction: You can use the Virtual Keyboard to test the sound, but you must manually change the velocity setting using the Velocity slider to hear the crossfading effect. Even with manual velocity adjustments you cannot properly evaluate the crossfade settings with the Virtual Keyboard.
  8. Re-enable sound layers 3 and 4 by checking the boxes at the bottom of the Drum Edit window. Test the full sound.

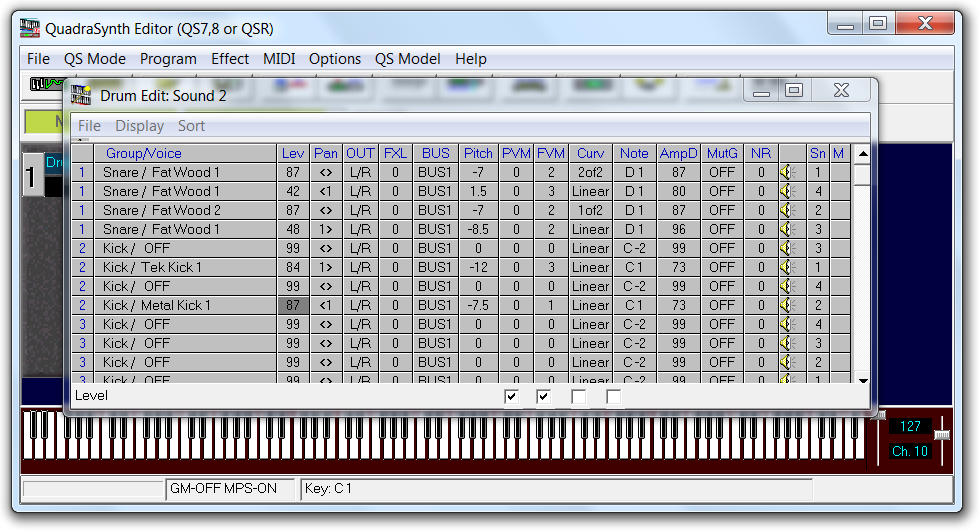
Editing the Kick Drum Sound

  1. Select the samples shown below for voice number 2, layers 1 and 2.
  2. Adjust the parameters for the kick sounds as shown.
    QS Edit Pro Drum Edit window, kick drum layers 1 and 2
  3. Play the kick sound using note C1.
    The "Tek Kick 1" and "MetalKick 1" samples are layered with slight panning left and right. One sample contains the low frequencies and the other provides the crunch sound.
  4. Add the "Toms/Lo Floor Tom 1" sound with the settings shown below.
    QS Edit Pro Drum Edit window, kick layers with Lo Floor Tom 2 sound
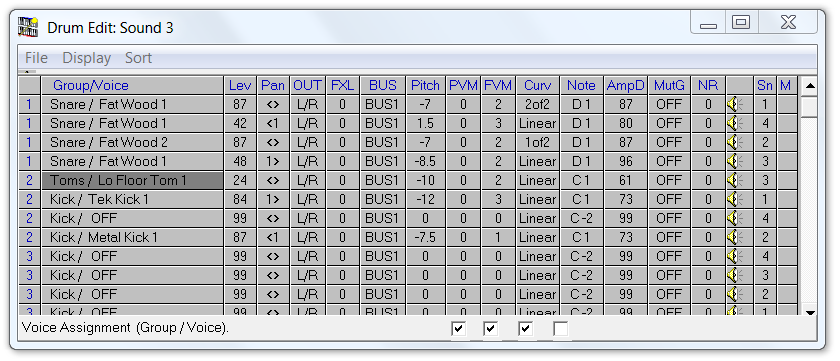
    Tip: The "LoFloor Tom 1" sample is detuned to bring it into the kick drum frequency range. Its interesting decay adds realism to the kick sound.
  5. Add the last kick sample as shown below. Locate the "Low Sine" sample in the Wave Sound Group.
    QS Edit Pro Drum Edit window, 4 kick drum sound layers
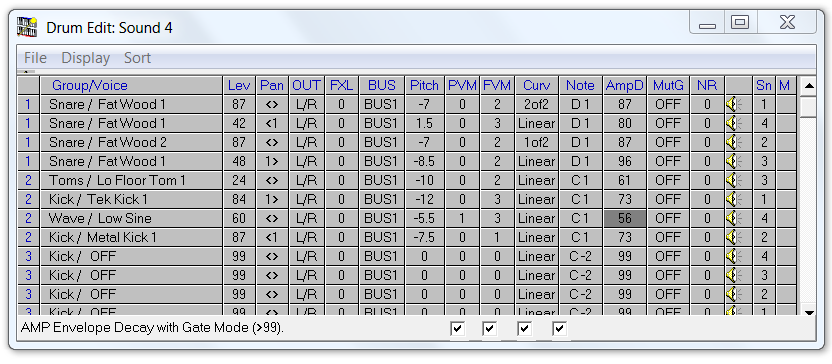
    Tip: The sine wave is blended to add the bottom end to the kick sound. You can adjust the pitch of the sine wave to suit the composition.

Editing the Tom Sounds

Tip: The QSR provides high quality tom sounds that can be used without layering. Toms are assigned to notes in the range of F1–D2. To complete our Program, we will add the 6 toms on layer 1 using voice number 1.

  1. With the Drum Edit window open, click Display > Drum 1. This makes the window easier to work with since we will assign toms to layer 1.
  2. Click on a cell in the Voice Number column, then click Sort.
  3. Add the toms to the Drum Edit window as shown below.
    QS Edit Pro Drum Edit window, Drum 1 display with tom sounds
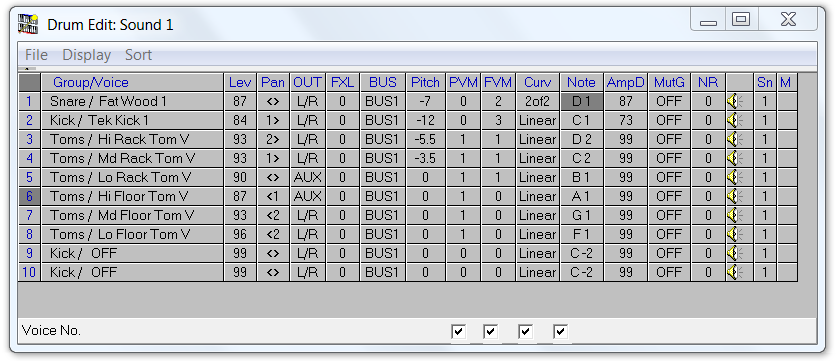
    Tip: Observe the Pan settings for each tom. Normally, toms are panned from side to side as they would be heard with a live drum kit. You can use other panning if you desire.
  4. Audition the kick, snare, and toms using your pads or triggers. Make adjustments as appropriate.
    Tip: Do not spend a lot of time balancing the kick and snare levels because these levels can be adjusted in the Mix. However, it is important that the tom levels are balanced at the Program level because they will be used as a group in the Mix.
  5. Close the Drum Edit window, then press STORE twice on the QSR front panel to save your edits.
  6. Write the Program to the desired Program location in the User bank.
  7. Save the Program to the computer.

Results

You can now use your custom Program in Mixes. Try substituting this Program in different channels of the Mix Template.