Installing Software

Install and configure Sound Bridge and QS Edit Pro software as part of the QS Drum Synthesizer setup process.

About this task

This topic covers the procedures for downloading, installing, and configuring the Sound Bridge and QS Edit Pro software applications required for programming the QSR Drum Synthesizer. This Manual supplements the software documentation from the manufacturers.

Links to sections in this topic

Procedure

Install Sound Bridge

Note: Sound Bridge software transfers project data (sample files, Programs, Mixes, Effects, sequences) from your computer to the PCMCIA Flash RAM card in slot [A] of the QSR. Alesis no longer supports Sound Bridge.

  1. Download Sound Bridge software using the link below.
  2. Extract the contents of the Sound Bridge zip file into a folder.
  3. Double-click the SETUP.EXE file to begin installation.
  4. After installation, navigate to the Sound Bridge installation folder. Double-click the SoundBridge.hlp file to open the help files for the application.
    Tip: You can also access the help files from within the Sound Bridge application.
  5. Review the help files to become familiar with the operation of the software.

Configure Sound Bridge

  1. Open Sound Bridge.
  2. Click Project > Card Info.
  3. In the Card Info dialogue box, set the Card Size and Target parameters.
    Sound Bridge Card Info dialogue box, recommended settings
    Important: The Card Size setting must match the storage capacity of the PCMCIA card you will use. The 8MB Flash RAM card is the recommended type (select 8 Meg).
    Important: Sound Bridge can be used with Alesis Quadrasynth models or with the Alesis DM Pro drum synthesizer. Select QS Synthesizer.
  4. Click OK to close the Card Info dialogue box.
  5. Click Project > MIDI Setup....
    Sound Bridge MIDI Setup window
  6. Select the MIDI Input and Output ports that correspond to your setup. Click OK to close the window.
  7. Click Project > Test MIDI IO.
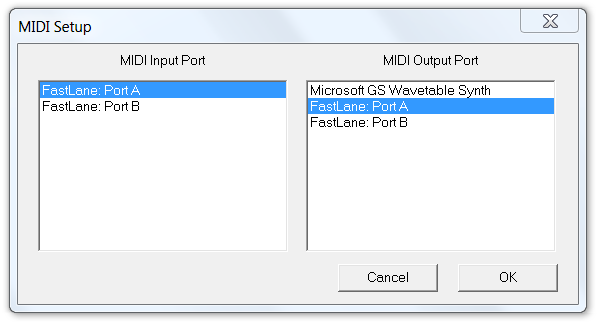
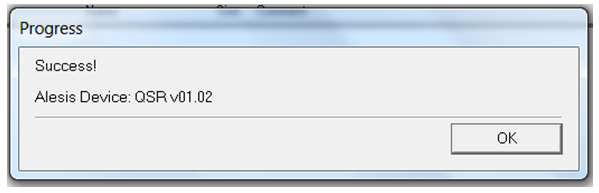
  8. Verify that the MIDI communication test was successful.
    Sound Bridge MIDI communication status message
    Trouble: If Sound Bridge reports an error with the MIDI communication, check your MIDI connections and the MIDI Setup settings.
  9. Click OK to close the MIDI status window.

Download and install QS Edit Pro software

Note: QS Edit Pro, a third-party application available from Sound Tower, Inc., allows visual editing of QSR Programs, Mixes, Effects, and Global Settings. Sound Tower charges a small licensing fee for the software but I recommend using it. You will find it impractical to program the QSR using the front panel controls.

  1. Use the link below to find the Sound Tower QS Edit Pro page.
  2. Purchase the QS Edit Pro software.
  3. Follow the instructions to download and install the software.
  4. Connect your computer's MIDI interface to the QSR MIDI In and MIDI Out ports. Refer to the instructions for your specific MIDI interface.

Test QS Edit Pro MIDI communication

  1. Use the procedure described in the Verifying QS Edit Pro MIDI Communication topic to test the MIDI interface.

Configure QSR Global Settings

  1. Open the Global Settings window by clicking MIDI > Global Settings.
  2. Adjust the Global Settings to match the image below.
    QS Edit Pro Global Settings dialogue box, recommended settings
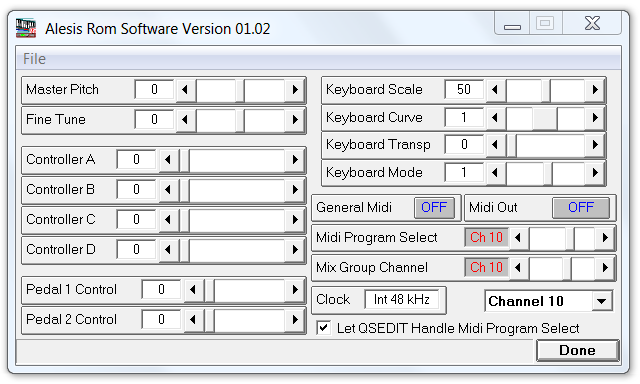
    Tip: The important settings are highlighted below:
    • General Midi is OFF
    • Midi Out is OFF
    • Midi Program Select is set to 10 (or another channel you will use for Mix changes)
    • Mix Group Channel is set to 10
    • QS Global Transmit Channel is set to Channel 10 (this must match the QSR channel on the LCD display when in Program mode for Program changes to work, and it must match the Midi Program Select channel when in Mix mode for Mix changes to work.)
    • Check the box that allows QS Edit Pro to manage the MIDI Program Select parameter.
    Attention: When QS Edit Pro manages the MIDI Program Select parameter you may notice some confusing behavior. This is because the QSR requires different settings for this parameter, depending on whether it is being used in Program or Mix play mode. After you use QS Edit Pro to change modes, the QSR LCD display shows the Global Settings screen. If you look closely, you will see the different settings, depending on mode that was last selected. After changing to Program Mode, the display shows "MIDI prgS1:ON". After using QS Edit Pro to change to Mix Mode, the QSR LCD display shows "MIDI MixS1:CH10". Do not be confused by this.
    Attention: You may also be confused by the behavior of the Global Settings dialogue box. The displayed setting for the Midi Program Select parameter changes with the mode. If you set this parameter to the desired Mix change control channel (e.g., channel 10), save the changes, and later return to the Global Settings window, you may see the parameter has changed to ON. This is normal. Do not attempt to reset the parameter because it will be set to ON when you change to Program mode again.
  3. Click Done to close the Global Settings window.

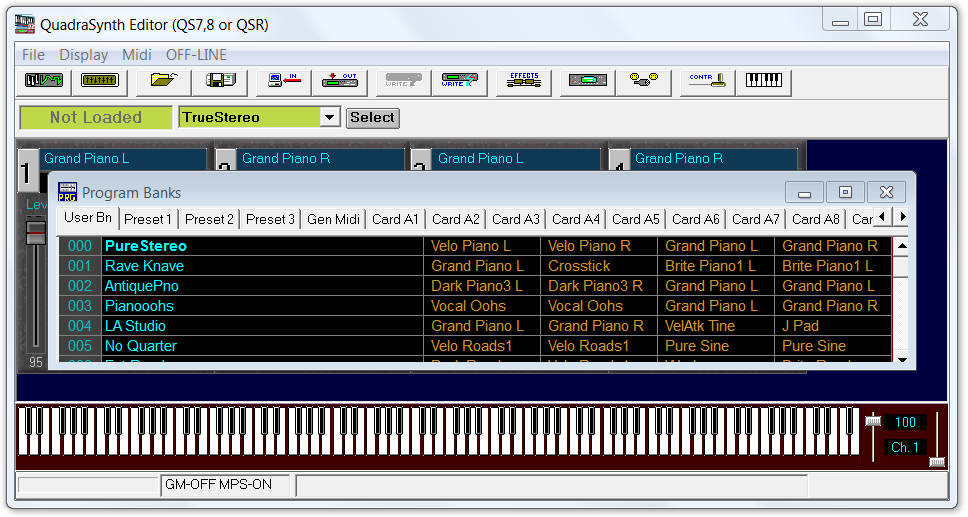
Synchronize QS Edit Pro and the QSR

  1. Use the procedure in the Receiving the QS Dump ALL Sysex File topic to transfer the QSR User bank data to QS Edit Pro.
    Trouble: This step ensures that the Program and Mix names displayed in QS Edit Pro match the actual data in the QSR.

Test the QS Edit Pro installation

  1. Click QS Mode > Program Mode to put the QSR in Program play mode.
    Tip: The LCD display on the QSR will respond by briefly displaying the message: "SENDING OUT MIDI DATA…" each time you change modes, indicating that the QSR is receiving MIDI mode change messages.
    Note: After the mode change completes, the QSR will display the Global Edit screen. This display results from QS Edit Pro managing the MIDI Program Select parameter with each mode change, as expected. You can press the PROG button on the QSR front panel to change to the normal display.
  2. Verify that the Program name on the QSR front panel LCD display matches the Program name shown on the QS Edit Pro window.
  3. In the QS Edit Pro Program Mode window, click the Select button to open the Program Banks window.
    QS Edit Pro Program Banks window
  4. Change the Program by selecting a different Program name in the Program Banks window, then close the window.
  5. Verify that the new Program name shown in the QS Edit Pro Program mode window matches the QSR front panel LCD display Program name.
    Trouble: If the Program name does not change after changing the Program in QS Edit Pro check the MIDI channel on the QSR front panel LCD display and the Global Transmit Channel setting in Global Settings. They must match.
  6. Click QS Mode > Mix Mode to change to Mix play mode.
  7. Press the MIX button on the QSR front panel.
  8. Verify that the Mix name in QS Edit Pro matches the Mix name on the QSR front panel LCD display.
  9. Click the Select button to open the Mix Select window.
  10. Select a different Mix then close the Mix Select window.
  11. Press the MIX button on the QSR front panel.
  12. Verify that the Mix name in QS Edit Pro matches the Mix name on the QSR front panel display.
    Trouble: If you cannot change the Mix using QS Edit Pro, check the Global Settings window. The Midi Program Select channel must match the Global Transmit Channel setting.